Q: IPNetwork monitoring service gets stopped right after it’s started. How do I check whether monitoring data and settings are fine?
A: try following the steps below, or contact our Tech. Support.
Table of contents
1. Preliminary notice
Important! Fixing IPNetwork monitoring database is a set of advanced techniques. Make sure you have DBA (database administration) experience before going on. If unsure, either find and ask someone with DBA experience to do that for you, or ask us to help. Unless you fully understand what you are doing, you can irreversibly damage database, so the remaining option would be to install IPNetwork Monitor with clean database.
2. When shall I check my monitoring database?
The following are typical syndromes of monitoring database inconsistency that could suggest checking the database
- IPNetwork monitoring service stops soon after it’s started, or refuses to start
- there are messages in service.log file telling that a SQL query can’t be executed
- frequent, spurious 10054 and/or 10061 error records in firebird.log
- after upgrading to newer version, IPNetwork Monitor refuses to accept license key
- new monitors can’t be added, or monitoring data is not updated
- automated or manual DB backup fails
3. Prerequisites for database analysis
To check and fix database, you can use any platform supporting Firebird server (version 3.0), and FlameRobin database administration tools (the latter is Java-driven, so basically it runs n every platform supporting Java 1.8 or above).
3.1. Install Firebird database server
IPNetwork uses Firebird 3.0 database server. For compatibility reasons, use 32-bit versions of both Firebird server and FlameRobin administration tool. The below screenshots and instructions are provided for 32-bit versions.
Important: before commencing Firebird server installation, make sure IPNetwork monitoring service and bundled Firebird server are both stopped,Use task Manager to terminate fbserver.exe process if it is running.
3.1.1. Firebird database server 3.0
Download the matching installer from Firebird site (it’s OK to download version “for the first time users”) and run it:
- Select Setup language (It is assumed English has been selected; choose whatever language you need), click “OK”.
- Select “I accept the agreement”, click “Next”.
- Read the provided details on “Information” page, click “Next”.
- Select installation folder (below it is assumed default one is chosen), click “Next”.
- On “Select components” leave defaults (choose all components). Click “Next”.
- Click “Next” on “Select Start Menu Folder” (or choose whatever you wish).
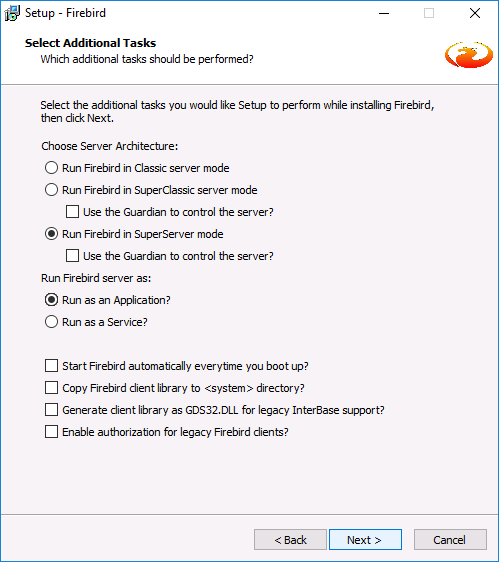
- On “Select Additional Tasks” choose options according to the below screenshot

Click “Next”.
- On “Create a password for Database System Administrator” page, enter “masterkey” (without quotes) in both fields. Click “Next”.
- On “Ready to Install” review the installation options. If everything is correct, click “Install” and wait till the installation ends.
- On “Information” window read the provided information and click “Next”.
- On “Completing the Firebird Setup Wizard” uncheck everything and click “Finish”.
Create a shortcut for the installed server, add “-a” command-line parameter to the command (“Target” field), e.g.:

Click “Advanced”, check “Run as administrator” and click “OK”:

Important: Firebird should be started in elevated mode (“Run as Administrator”). To stop Firebird server, right-click its icon in system tray and select “Shutdown”.
On first run, firewall window might appear. In that case, allow Firebird the proposed access:

Click “Allow access”
Two or more Firebird instances won’t run simultaneously; always stop the Firebird server before starting IPNetwork monitoring service.
3.2. Install database administrator tool
Open the FlameRobin site. Download the latest 32-bit version (0.9.13.031ad5f at the moment of writing this guide). Run the installer.
- Click “I accept the agreement” option on the screen and click “Next”.
- Click “Next” on “Select Additional Tasks” (choose whatever you wish or leave all as is).
- Click “Install” and wait till the installation ends.
- Uncheck both checkboxes and click “Finish”.
3.2.1. FlameRobin first run
FlameRobin requires client library, file fbclient.dll, be copied into its installation directory (C:\Program Files (x86)\FlameRobin in case of Windows) to work with Firebird databases. The default locations of this file:
| Library file source | Folder name |
|---|---|
| Firebird 3.0 | C:\Program Files (x86)\Firebird\Firebird_3_0 |
| Bundled with IPNetwork | C:\Program Files (x86)\IPNetwork Monitor\firebird\bin |
Important: other conditions equal, use the library from higher Firebird versions. Note that it’s safe to just copy the fbclient.dll from the Firebird bundled with latest IPNetwork version. Backup (e.g., rename) the fbclient.dll file bundled with FlameRobin before you overwrite it.
On first run, FlameRobin might inform that configuration file doesn’t yet exist. Click “OK” to continue.
When FlameRobin starts, you will see default Firebird server, named Localhost. Right click it and select “Server registration info”. Fill the registration info like below:

Note: you can right-click on “Home” and add another server. You can add an entry for Firebird server bundled with IPNetwork (use port value 3055 in that case). To use bundled database server, make sure its fbserver.exe process is running.
Select the server name and right click, choose “Register existing database”. Enter the data like below:

Use the below user/password pairs
| Firebird server type | Username | Password |
|---|---|---|
| Standalone (Firebird 3.0) | SYSDBA | masterkey |
| Bundled with IPNetwork | SYSDBA | fb@iph0st |
Right-click the database and choose “Connect”; if everything was entered correctly, FlameRobin should connect to the database:

You are currently set up to alter the database as required.
Copy monitoring database
Make a copy of your database to inspect, rather than handling the original IPNetwork monitoring database in place. Attempt to modify in-use monitoring database may have disastrous consequences.
Stop monitoring service (from IPNetwork Monitor GUI client Tools menu), the start Task Manager and make sure there are no fbserver.exe processes running. If there are, terminate them.
Locate your database file (nms.fdb), its typical location: “C:\ProgramData\IPNetwork Monitor\data\nms.fdb”.
Copy nms.fdb file elsewhere. For the sake of example, we assume you have copied it to C:\Firebird (assuming you’re using Windows to handle database; wherever required, there will be notices for other OSes).
3.3. Set up environment
3.3.1. Windows
- If you plan to use IPNetwork’s bundled Firebird server, just keep IPNetwork monitoring service running. When creating database connection in FlameRobin, use TCP port 3055.
- If you wish to use standalone Firebird server (installed per instructions above), then
- stop IPNetwork monitoring service
- stop IPNetwork Monitor GUI client (“Alt-X”)
- make sure fbserver.exe process is stopped (use Task Manager for that)
- run elevated Firebird standalone server (“Run as Administrator”)
Start elevated cmd.exe (“Run as Administrator”). Type the below commands
set ISC_USER=sysdba
set ISC_PASSWORD=masterkey
Note: if Firebird server bundled with IPNetwork is used, set credentials variables like this:
set ISC_USER=sysdba
set ISC_PASSWORD=fb@iph0st
Depending on what Firebird server will be used, type the corresponding command:
| Firebird server type | Command |
|---|---|
| Firebird 3.0 | set PATH=C:\Program Files (x86)\Firebird\Firebird_3_0;%PATH% |
| Bundled with IPNetwork | set PATH=C:\Program Files (x86)\IPNetwork Monitor\firebird\bin;%PATH% |
Important: do not close the elevated cmd.exe after you performed the steps above; if you accidentally close it, just peform the settings mentioned above again.
3.3.2. Linux
It is assumed that default installation path for Firebird 3.0 is /opt/firebird3.
On the System running IPNetwork:
- stop IPNetwork monitoring service
- stop IPNetwork Monitor GUI client (“Alt-X”)
- make sure fbserver.exe process is stopped (use Task Manager for that)
- run elevated Firebird standalone server (“Run as Administrator”)
Start a terminal window. Type the below commands
export ISC_USER=sysdba
export ISC_PASSWORD=masterkey
Depending on what Firebird server will be used, type the corresponding command:
| Firebird server type | Command |
|---|---|
| Firebird 3.0 | export PATH=”/opt/firebird3/bin:${PATH}” |
Note: depending on how Firebird was installed, you might need to chown database file and/or current directory name, to access the database file.
4. Checking monitoring database for problems
4.1. Find and fix database errors
Important: it is assumed you use the command-line processor window, set up on step 3.3. above, to run the below commands.
Below is short sequence of typical commands to perform analysis and fixing the database. If you need in-depth explanations what those commands mean, please refer to Firebird 2.5 language reference update.
1. Run database problem detection command (hereinafter we assume that monitoring database file we fix is named nms.fdb):
gfix -v -i -full -n nms.fdb
If there are problems, gfix will print something like
Summary of validation errors
        Number of data page errors      : 2
        Number of index page errors     : 9
        Number of database page errors  : 4
(actual numbers may differ in your case). If there are no problems with database, gfix will print nothing.
Important: if you see diagnostics like
I/O error during "open" operation for file "nms.fdb.delta"
, then you should issue command
nbackup -F nms.fdb
and re-attempt the above gfix call again.
2. If there are errors, prepare database to backing up
gfix -mend nms.fdb
3. Do backup copy of database, ignoring, if we have to, damaged records. Try this command first:
gbak -b nms.fdb nms.gbak
If there are errors printed about inability to back up, remove file nms.gbak and issue command
gbak -b -i nms.fdb nms.gbak
If “gbak: ERROR:internal Firebird consistency check” is reported, remove nms.gbak. if exists, and issue command
gbak -g -b -i nms.fdb nms.gbak
If an error is still reported, database file may be beyond repair. Please send us the database and the error message gbak reported, in case we could know how to handle the situation.
4. Restore database backup without creating indices:
gbak -r -n -i nms.gbak nms-noindex.fdb
5. Shut down and reopen the database file:
gfix -shut multi -force 0 nms-noindex.fdb
gfix -online nms-noindex.fdb
Note: you may choose any other file name instead of “nms-noindex.fdb” above. This is temporary database file name we will further process in Firebird database administrator utility, to restore indices and check sequences states.
4.2. Fix database tables indices
The following steps are simpler done with database administration tool (FlameRobin, DBeaver etc). Use ifnormation from “FlameRobin first run” section above to add the database file with disabled indices you have generated at the previous step.
Right-click database and choose “Execute SQL statememts”. Paste the below block into newly opened window:
SET TERM !! ;

EXECUTE BLOCK AS
DECLARE VARIABLE stmt VARCHAR(1000);
BEGIN
for select 'ALTER INDEX '||rdb$index_name ||' ACTIVE;'
from rdb$indices
where (rdb$system_flag is null or rdb$system_flag = 0)
order by rdb$foreign_key nulls first
into :stmt
do EXECUTE STATEMENT :stmt;

END!!

SET TERM ; !!
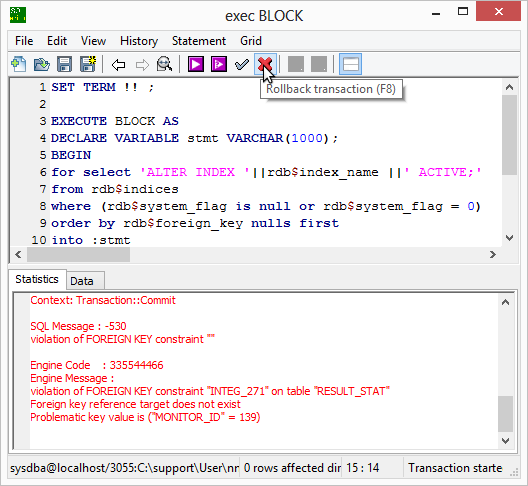
What it does: scans database for inactive indices and tries to enable them. Click “Execute statements” icon (or press F4). It should perform without errors. Then click “Commit transactions” (or press F5). If database is inconsistent, there will be errors, hinting what constraint for which table prevents query from being committed.
b) Typical error looks like this:

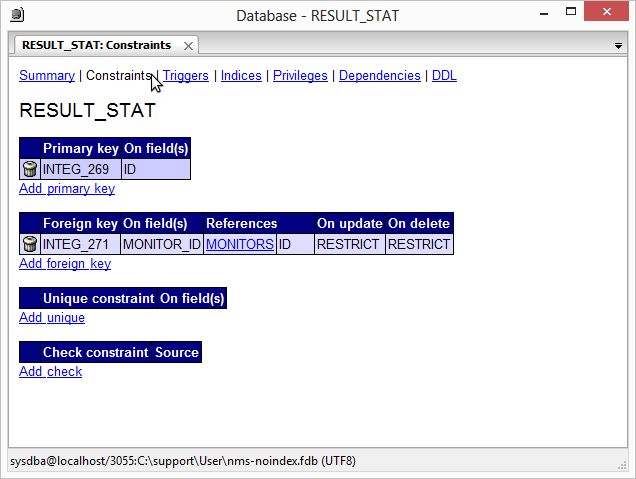
c) For this given example: there’s problem with constraint INTEG_271 for table RESULT_STAT. In the FlameRobin data tree for database connected, click on Tables to list the entries, find RESULT_STAT, right-click on it and select Show Properties. Click on Constraints tab:

In the above example there’s problem matching field MONITOR_ID against ID field of MONITORS table. To fix it, let’s find what entries in RESULT_STAT do not refer to existing IDs entries in table MONITORS: open another “Run a query” window and execute the following query:
SELECT ID FROM RESULT_STAT WHERE (MONITOR_ID NOT IN (SELECT ID FROM MONITORS));
If the list of IDs is non-empty, you can inspect them if necessary, or simply delete those “orphan” entries that conflict with the constraint:
DELETE FROM RESULT_STAT WHERE (MONITOR_ID NOT IN (SELECT ID FROM MONITORS));
Press “Execute” and “Commit”. Now switch to SQL query with execution block (see step a) above) and press “Rollback” (or F8).
Now repeat attempt to re-enable indices (on step a) above). Fix the found table problems according to what error commit operation displays.
As soon as the re-enabling indices worked without errors, we can switch to next operation (checking sequences).
4.3 Fix database sequences (generators)
For every row in the table below do the following:
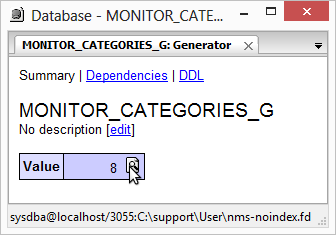
a) Select corresponding sequence (generator) from Generators branch in database tree view and click Show Properties
b) For corresponding table and its field name run the following SQL query:
SELECT MAX(fieldname) FROM tablename
(replace entries in green with actual field name and table name)
c) If generator data value less than the result of query, alter generator value by clicking to icon to the right of the value:

Set new value to the result of table query increased by 1, then click on “OK” and “Commit” in resulting pop-up.
| Sequence name | Table name | Table field | Comment | |
|---|---|---|---|---|
| ACS_LINES_ID_G | A_CONFIG_SECTION_LINES | ID | ||
| ACTIONS_ID_G | ACTIONS | ID | ||
| ACTION_TYPES_ID_G | ACTION_TYPES | ID | ||
| AC_SECTIONS_ID_G | A_CONFIG_SECTIONS | ID | ||
| APPLICATIONS_ID_G0 | APPLICATIONS | ID | ||
| APPLICATION_LINES_ID_G0 | APPLICATION_LINES | ID | ||
| A_CONFIGS_ID_G | A_CONFIGS | ID | ||
| A_SETTINGS_G | A_SETTINGS | ID | ||
| A_SETTING_ENUMS_G | A_SETTING_ENUMS | ID | ||
| A_SETTING_TYPES_G | A_SETTING_TYPES | ID | ||
| A_STATE_ID_G | A_STATE | ID | ||
| COMP_ALERTS_ID_G | COMPOSITE_ALERTS | ID | ||
| C_ALERT_LINES_ID_G | COMPOSITE_ALERT_LINES | ID | ||
| G_SETTINGS_G | G_SETTINGS | ID | ||
| HOSTS_ID_G0 | HOSTS | ID | ||
| HOST_TYPES_G | HOST_TYPES | ID | ||
| MAINTENANCE_G | MAINTENANCE | ID | ||
| MAIN_CONFIGS_ID_G | MAIN_CONFIGS | ID | ||
| MONITORS_ID_G0 | MONITORS | ID | ||
| MONITOR_CATEGORIES_G | MONITOR_CATEGORIES | ID | ||
| MONITOR_TYPES_ID_G0 | MONITOR_TYPES | ID | ||
| M_SETTINGS_FOR_MONITORS_G | M_SETTINGS_FOR_MONITORS | ID | ||
| M_SETTINGS_FOR_TEMPLATES_G | M_SETTINGS_FOR_TEMPLATES | ID | ||
| M_SETTINGS_FOR_TYPES_G | M_SETTINGS_FOR_TYPES | ID | ||
| M_SETTING_ENUMS_G | M_SETTING_ENUMS | ID | ||
| M_SETTING_TYPES_G | M_SETTING_TYPES | ID | ||
| NETWORKS_ID_G0 | NETWORKS | ID | ||
| NETWORK_DISCOVERY_PARAMS_ID_G0 | NETWORK_DISCOVERY_PARAMS | ID | ||
| PLUGINS_G | PLUGINS | ID | ||
| REPORTING_G | REPORTING | ID | ||
| REP_MONITORS_REPORT_ID_G | REP_MONITORS | REPORT_ID | (remove table entries) | |
| RESULT_GRAPH_G | RESULT_GRAPH | ID | ||
| RESULT_LOG_G | RESULT_LOG | ID | ||
| RESULT_STAT_G | RESULT_STAT | ID | ||
| SCHEDULES_ID_G | SCHEDULES | ID | ||
| SC_CONFIGS_ID_G | SC_CONFIGS | ID | ||
| SC_CONFIG_SECTIONS_ID_G | SC_CONFIG_SECTIONS | ID | ||
| SC_SECTION_LINES_ID_G | SC_SECTION_LINES | ID | ||
| SNMP_CRED_ID_G | SNMP_CREDENTIALS | ID | ||
| SYSLOG_G | SYSLOG | ID | ||
| TEMPLATE_ATTACHMENTS_ID_G0 | TEMPLATE_ATTACHMENTSS | ID | ||
| TEMPLATE_CATEGORIES_ID_G0 | TEMPLATE_CATEGORIES | ID | ||
| TEMPLATE_MONITORS_ID_G0 | TEMPLATE_MONITORS | ID | ||
| TEMPLATES_ID_G0 | TEMPLATES | ID | ||
| UNIX_CRED_ID_G | UNIX_CREDENTIALS | ID | ||
| WIN_CRED_ID_G | WIN_CREDENTIALS | ID |
4.4. Check database in action
After you have fixed the indices and generators, disconnect FlameRobin, stop IPNetwork monitoring service, copy the fixed database as nms.fdb, replacing existing database file, and start IPNetwork Monitor GUI client and monitoring service again.
Watch the monitoring for at least few minutes. Make sure you can change monitors data, and that reporting data are updated as time goes by. Check service.log file for possible database problems after the monitoring started (you should pay extra attention to possible SQL error reports). If there are any inconsistencies, resume fixing nms-noindex.fdb, according to what you have found.
4.5. Special cases
4.5.1. Huge database
If you are dealing with databases more than 50-75Mb in size, it might be convenient to create temporary indices, to speed up the process of fixing up. Run and commit the following queries (in “Run a query” window)
CREATE INDEX TMP_IDX_MONITORS_ID ON MONITORS(ID);
CREATE INDEX TMP_IDX_RESULT_STAT_MID ON RESULT_STAT(MONITOR_ID);
CREATE INDEX TMP_IDX_RESULT_LOG_MID ON RESULT_LOG(MONITOR_ID);
CREATE INDEX TMP_IDX_RESULT_RAW_MID ON RESULT_RAW(MONITOR_ID);
CREATE INDEX TMP_IDX_RESULT_GRAPH_MID ON RESULT_GRAPH(MONITOR_ID);
CREATE INDEX TMP_IDX_SETTINGS_MID ON M_SETTINGS_FOR_MONITORS(MONITOR_ID);
CREATE INDEX TMP_IDX_STATE_MID ON A_STATE(MONITOR_ID);
After all the fixing is done, drop the temporary indices:
DROP INDEX TMP_IDX_MONITORS_ID;
DROP INDEX TMP_IDX_RESULT_STAT_MID;
DROP INDEX TMP_IDX_RESULT_RAW_MID;
DROP INDEX TMP_IDX_RESULT_LOG_MID;
DROP INDEX TMP_IDX_RESULT_GRAPH_MID;
DROP INDEX TMP_IDX_SETTINGS_MID;
DROP INDEX TMP_IDX_STATE_MID;
4.5.2. Duplicate entries in primary indices
If you see SQL error that duplicate entries cannot be added to primary index, perhaps there are duplicate values. For the table in question, choose Show Properties, switch to Indices tab, and for the index with PRIMARY string in its name memorize which fields are participating in primary index. Then run SQL query like
SELECT
  fieldlist,
  COUNT(*)
FROM tablename
GROUP BY fieldlist
HAVING COUNT(*) > 1
Remove all but single copy of entries with duplicate values for one of the above field(s). Index and table names can be found in RDB$INDICES system table, if not directly reported.
5. Preventing subsequent database failures
After you have restored the monitoring database, please take some precautions to diminish or nullify chances to have the database broken in similar manner in the future:
5.1. Keep database tidy
Huge database mean more disk system load; unless you really need that, try to avoid storing monitoring and log data for large period of time. Open, in IPNetwork Monitor GUI client, Settings -> Monitoring, and set, in Monitoring Settings section, proper values for data retention periods. In most cases, 30 days is enough.
Note that you can empty RESULT_* and SYSLOG tables at database recovery time, to remove those records (which will be re-filled with new data as monitoring goes on), by executing queries like
DELETE FROM RESULT_GRAPH;
DELETE FROM RESULT_LOG;
DELETE FROM RESULT_RAW;
DELETE FROM RESULT_STATS;
DELETE FROM SYSLOG;
Note: do not remove those data unless database became way too large.
5.2. Avoid bottlenecks
If you notice IPNetwork became slow to response, or alerts are executed with significant delay, make sure the computer with IPNetwork running has enough resources:
- disk drive is fast and can handle much I/O
- There’s at least 2Gb RAM and corresponding swap space available
- network speed is fast and connectivity is stable
You can use tool like Process Explorer to detect possible bottlenecks.
5.3. Hardware health checks
Do not forget to check hardware for possible problem (on computer where IPNetwork is running). Note that you can utilize IPNetwork-provided hardware monitors to find possible problems as soon as possible.
5.4. Detect monitoring service failure
You are advised to use external monitoring of IPNetwork monitoring service to be alerted when/if monitoring service is stopped. if it is stopped, it’s mos probably indicates an error.
5.5. Monitor database health
You are strongly encouraged to setup and run the following monitor to ensure database health is in good state:
-
- monitor to check that database is backed up daily
The backup mentioned is optional, but we recommend to make it mandatory.
Related topics

